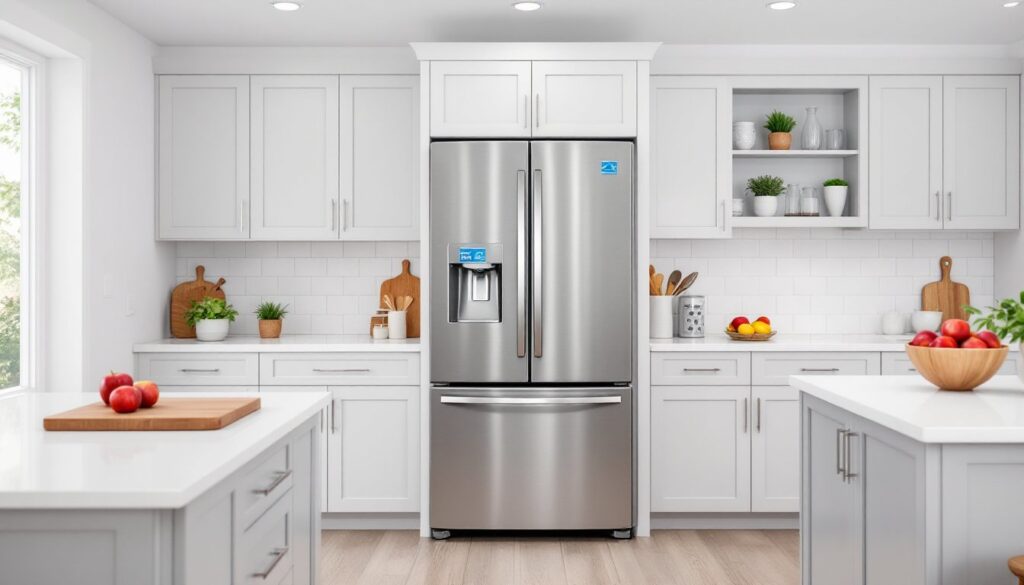

Top freezer refrigerators with ice makers strike a practical balance between classic design and modern convenience. They’re budget-friendly, energy-efficient, and deliver cold storage exactly where most families use it most, at eye level. If you’re upgrading an old fridge or outfitting a rental property, you’ve probably noticed that adding an ice maker to a top-freezer model gets you cold drinks on demand without the premium price tag of side-by-side or French door units. This guide walks through what to look for, which models deliver in 2026, and how to install and maintain your appliance so it runs trouble-free for years.
Table of Contents
ToggleKey Takeaways
- Top freezer refrigerators with ice makers are 10–15% more energy-efficient than side-by-side or French door models, translating to annual operating costs of $40–$60.
- Built-in ice makers produce 3–7 pounds of ice daily, eliminating manual tray filling while fitting standard kitchen openings of 30–33 inches wide.
- Key features to prioritize include Energy Star certification, adjustable glass shelves, noise ratings under 42 decibels, and a mechanical shut-off arm for reliability.
- DIY installation of water lines is straightforward with basic plumbing skills; use ¼-inch copper or braided stainless tubing and secure every 16 inches, then discard the first two ice bins.
- Routine maintenance—replacing water filters every 6 months, cleaning the ice bin quarterly, and vacuuming condenser coils biannually—prevents common issues like small cubes, bad taste, and reduced production.
- Top models like the Maytag MRT118FFFZ ($800–$900) and Whirlpool WRT518SZFM ($950–$1,050) offer reliable performance with proven parts availability and repair costs significantly lower than premium refrigerator styles.
Why Choose a Top Freezer Refrigerator with Ice Maker?
Top freezer refrigerators consistently rank among the most energy-efficient configurations. The compressor works less hard because cold air naturally sinks, keeping the refrigerator compartment cool without extra effort. That translates to lower electric bills, most Energy Star-certified top-freezer models use 10–15% less energy than comparable side-by-side or French door refrigerators.
Adding an ice maker to this setup means you skip the hassle of filling trays and free up freezer space. Built-in ice makers produce 3–7 pounds of ice per day, plenty for a household of four. That’s enough for daily use, weekend gatherings, and the occasional pitcher of iced tea without running out.
Space efficiency is another win. Top freezer models typically range from 18 to 22 cubic feet, fitting neatly into standard kitchen openings (30–33 inches wide). They’re also shorter than many French door units, so they slip under cabinets without custom modifications. If you’re working within a tight budget or a compact kitchen, a top freezer with ice maker often delivers the best return per square inch.
Finally, simplicity matters. Fewer electronic controls and door configurations mean fewer points of failure. When something does go wrong, parts are widely available and repairs cost less than high-end models. For DIYers comfortable with basic appliance work, that’s a real advantage.
Key Features to Look for When Shopping
Start with capacity. Measure your existing opening width, depth, and height, then subtract an inch on each side for ventilation. Standard top freezer fridges are 66–69 inches tall, 30–33 inches wide, and about 30–34 inches deep. If you’re replacing an older model, double-check that newer units haven’t added depth, some 2026 models gained an inch to accommodate thicker insulation and larger ice bins.
Look for adjustable shelves made of tempered glass. Spillproof edges contain leaks, and the ability to slide or remove shelves lets you fit tall bottles or sheet cakes without Tetris-level planning. Gallon door bins are standard, but some models add a can rack or adjustable bin dividers, handy if you stock a mix of condiments and beverages.
Energy Star certification is non-negotiable in 2026. Certified models use high-efficiency compressors, improved insulation, and LED lighting. Expect annual operating costs between $40 and $60, depending on local electricity rates.
Check the noise rating if your kitchen opens to living spaces. Compressors cycle on and off: older or cheaper models can hit 45–50 decibels (about as loud as a quiet conversation). Premium units run closer to 38–42 decibels. If the spec sheet doesn’t list decibels, read user reviews, noise complaints surface quickly.
Finally, confirm the water line requirements. Most ice makers need a ¼-inch copper or braided stainless supply line connected to cold water. Some newer models include a top freezer refrigerator with ice dispenser (through-the-door), which adds convenience but requires a door cutout and slightly more complex plumbing.
Ice Maker Types and Performance
Two main types dominate the market: built-in freezer ice makers and through-the-door dispensers.
Built-in ice makers sit inside the freezer compartment, typically on the left wall. They produce crescent-shaped or cube ice, dropping finished cubes into a pull-out bin. Bin capacity ranges from 3 to 5 pounds. These are the most common, least expensive, and easiest to repair. Expect production rates of 3–4 pounds per 24 hours under normal conditions (freezer set to 0°F, water supply at 40–60 psi).
Through-the-door dispensers (sometimes called external ice and water dispensers) mount in the freezer door. They deliver ice and chilled water without opening the door, reducing cold air loss. Production rates are similar, but door-mounted systems take up more freezer space and add $100–$200 to the purchase price. They also require a door cutout, so retrofitting isn’t practical. If you’re comparing options, kitchen design resources often discuss how door dispensers affect workflow and accessibility.
Both types rely on a solenoid valve to control water flow and a thermostat to monitor ice thickness. Quality varies by manufacturer. Look for models with a shut-off arm (mechanical) rather than an infrared sensor, arms are more reliable and easier to troubleshoot. Some units add a water filter inline, which improves taste and reduces sediment but requires replacement every six months (typically $20–$40 per filter).
Best Top Freezer Refrigerators with Ice Makers in 2026
Maytag MRT118FFFZ (18.2 cu. ft., 30-inch width) remains a workhorse. It earned top marks in independent appliance lab testing for temperature consistency and build quality. The ice maker sits on the left freezer wall, producing about 3.5 pounds per day. Shelves are adjustable, door bins fit gallon jugs, and the compressor runs quiet (40 dB). Street price hovers around $800–$900, and parts availability is excellent. It’s a solid pick for budget-conscious homeowners who want reliability over bells and whistles.
GE GTS18GTHWW (17.5 cu. ft., 28-inch width) fits tighter spaces without sacrificing ice production. The narrower footprint works in apartments, condos, or galley kitchens. It includes a factory-installed ice maker, three adjustable wire shelves, and humidity-controlled crisper drawers. Energy Star certified, it costs about $50 per year to run. Expect to pay $700–$800. One quirk: the ice bin is smaller (3 pounds), so heavy users may need to empty it into a cooler before parties.
Whirlpool WRT518SZFM (18 cu. ft., 30-inch width) adds a few upscale touches, LED lighting, electronic temperature controls, and a quieter compressor (38 dB). The ice maker produces 4 pounds daily, and the door-mounted design places dispensing controls within easy reach. It’s priced around $950–$1,050, positioning it between budget and premium tiers. If you’re planning a kitchen remodel and want an appliance that blends function with a cleaner aesthetic, this model delivers.
Frigidaire FFTR1835VW (18 cu. ft., 30-inch width) stands out for its reversible door hinge and bright interior lighting. The ice maker is factory-installed, and the unit ships with a two-year parts warranty (one year longer than most competitors). It’s a good choice for DIYers who prefer manufacturer support. Retail runs $850–$900.
All four models require a ¼-inch water line and 115V/15A electrical service. None need special venting or structural modifications.
Installation Tips for DIY Homeowners
Before delivery, measure the doorway path from your entry to the kitchen. Top freezer fridges are narrower than French door models, but you still need 31–34 inches of clearance (plus wiggle room). Remove door handles if the fit is tight, most unscrew with a ⅜-inch hex key.
Water line installation is straightforward if you have basic plumbing skills. You’ll need:
- ¼-inch copper tubing or braided stainless line (measure the distance from the fridge to your cold water supply, add 6 feet for slack)
- Saddle valve or compression tee fitting (saddle valves are easier for DIYers: compression tees are code-compliant in more jurisdictions)
- Teflon tape
- Adjustable wrench
- Tubing cutter (if using copper)
Shut off the main water supply or the branch line feeding your kitchen sink. Install the saddle valve on the cold water pipe under the sink (most codes allow this for appliances: check local requirements). Tighten the valve, drill the pilot hole through the pipe using the valve’s integrated piercing screw, then connect the ¼-inch tubing. Run the line along the baseboard or through the cabinet kickplate, securing it with plastic clips every 16 inches. Connect the line to the fridge’s inlet valve (usually on the lower back), hand-tighten, then snug with a wrench, don’t overtighten or you’ll crack the plastic threads.
Turn the water back on and check for leaks. It’s normal for the line to take 24 hours to purge air and for the first batch of ice to taste slightly plasticky. Discard the first two bins.
Electrical requirements are simple: a dedicated 115V, 15A outlet. Don’t use an extension cord, it violates NEC guidelines and voids most warranties. If your outlet is behind the fridge, confirm there’s enough slack in the power cord to pull the unit out for cleaning without unplugging it.
Level the fridge using the adjustable front legs. A bubble level on the top surface should show level side-to-side and a slight tilt backward (about ⅛ inch over 24 inches) to ensure the door closes on its own. Shim if necessary.
Allow the fridge to sit upright and unplugged for 4 hours after delivery before turning it on. This lets compressor oil settle. Once powered, wait another 24 hours before loading food, internal temperature needs time to stabilize.
Maintenance and Troubleshooting Your Ice Maker
Routine maintenance keeps your ice maker running efficiently:
- Replace the water filter every 6 months or per the manufacturer’s schedule. Clogged filters reduce flow and can cause hollow or small ice cubes.
- Clean the ice bin every 3 months with warm water and mild dish soap. Bacteria and mineral deposits build up over time, affecting taste.
- Vacuum the condenser coils (located on the back or underneath) every 6 months. Dust buildup forces the compressor to work harder, shortening its lifespan and increasing energy use. Use a coil brush (about $10 at hardware stores) and a shop vac.
- Check the water line for kinks or leaks annually. Replace copper tubing if you see corrosion or pinholes.
Common ice maker problems and fixes:
No ice production: Confirm the ice maker is switched on (look for a wire arm in the up position or a power switch). Check that the water supply valve is open and the line isn’t frozen. If the line is frozen, thaw it with a hairdryer on low heat, don’t use a torch. If water flows but no ice forms, the inlet valve or thermostat may have failed (replacement parts run $30–$60 and are DIY-friendly with a multimeter and basic tools).
Small or hollow cubes: Low water pressure (below 20 psi) or a clogged filter. Test pressure at the fridge inlet with a pressure gauge. If it’s below spec, install a booster pump or call a plumber to check your home’s supply.
Ice tastes bad: Replace the filter, clean the bin, and discard the first two batches after cleaning. If the problem persists, your municipal water may have high mineral content, consider an inline sediment filter.
Ice maker cycles but doesn’t eject ice: The ejector arm or motor gear may be stripped. This is a common wear item on older units. Replacement kits cost $40–$80 and include instructions. You’ll need a screwdriver and needle-nose pliers.
Leaking water: Check the inlet valve connection and the fill tube inside the freezer. If the tube is cracked or misaligned, water drips into the freezer or fridge compartment. Replacement tubes are inexpensive ($10–$15) and snap into place.
If you’re not comfortable diagnosing electrical or refrigerant issues, call an appliance technician. Most service calls run $100–$150 for diagnostics, with parts and labor extra. DIYers can handle water line, filter, and mechanical arm repairs, but compressor, sealed system, or control board failures require a pro.
Conclusion
A top freezer refrigerator with an ice maker delivers practical value without the premium price or complexity of high-end models. Focus on energy efficiency, ice maker type, and fit for your space. Installation is manageable for DIYers with basic plumbing skills, and routine maintenance, filter swaps, coil cleaning, and line checks, keeps the appliance running smoothly. Whether you’re replacing an old unit or upgrading a rental property, this configuration remains one of the most reliable choices in 2026.